[Android] How to Customize View

Customize View,Animation UI Development

Posted by xiuyuantech on 2020-06-28

作为Android开发工程师一定会遇到一些特殊或者酷炫UI需求,当系统提供的View无法实现时,
我们可以通过自定义View来实现。自定义View大概可以分为组合View继承系统已有View组件
(例如TextView)和继承View或者ViewGroup三大类。

先看下实现的效果:
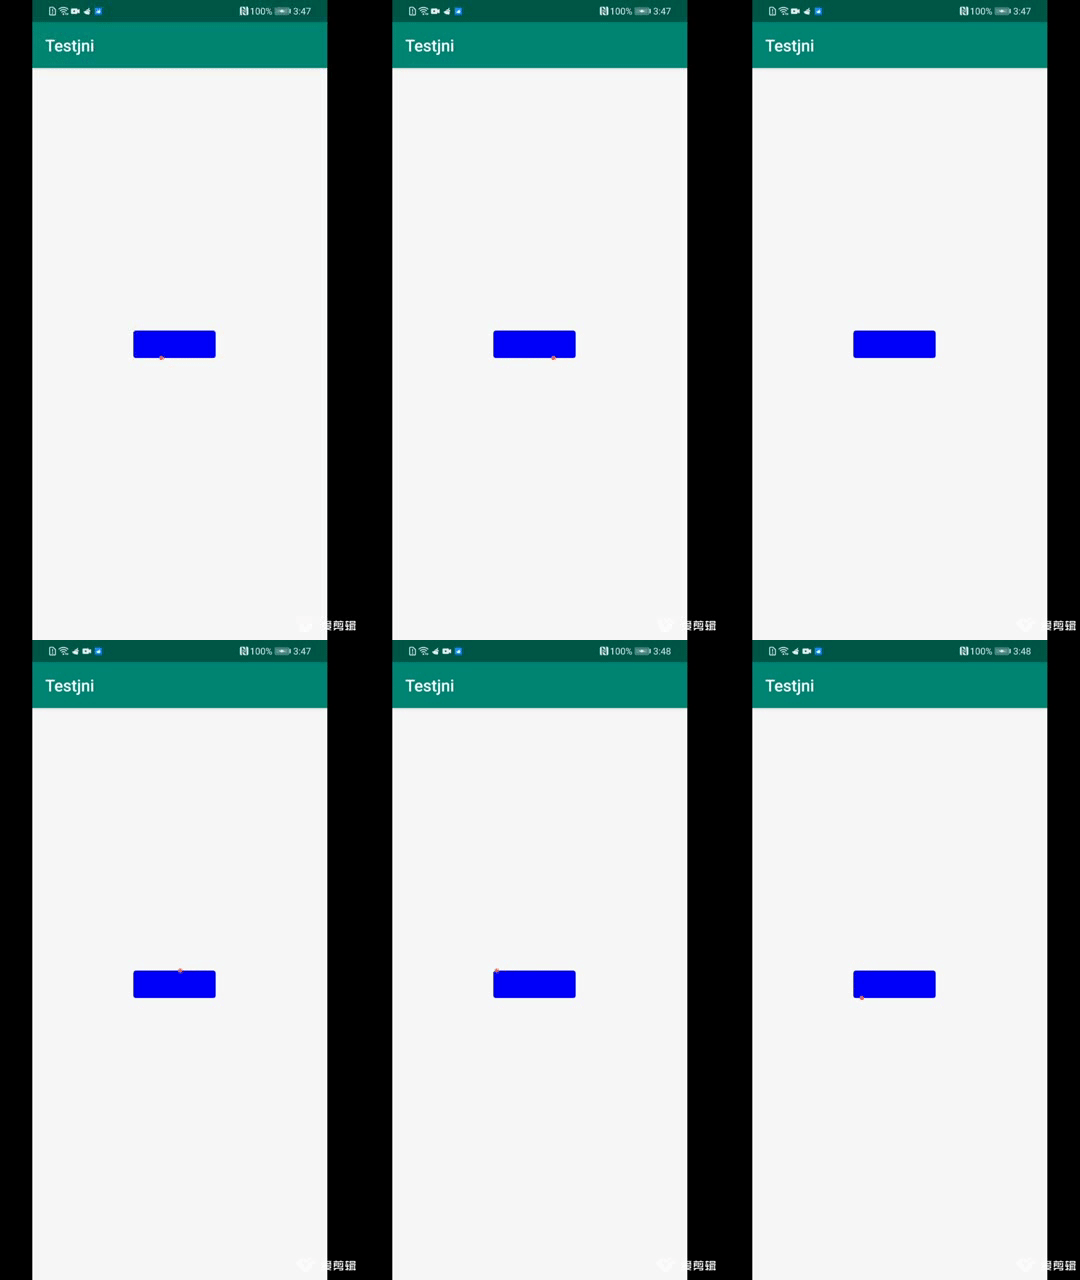
月报动画

想要实现自定义View需要了解哪些东西呢,请下面

生命周期

(1)Constructors()

View在代码中被创建时调用第一种构造方法,View从layout中加载出来时会被调用第二种构造方法,其中XML中的属性也会被解析。

(2)onFinishInflate()

该方法当View及其子View从XML文件中加载完成后触发调用。通常是在Activity中的setContent方法调用后调用。

(3)onVisibilityChanged()

该方法在当前View或其祖先的可见性改变时被调用。如果View状态不可见或者GONE,该方法会第一个被调用。

(4)onAttachedToWindow()

当View被附着到一个窗口时触发。在Activity第一次执行完onResume方法后被调用。

(5)onMeasure()

该方法确定View以及其子View尺寸大小时被调用。

(6)onSizeChanged()

该方法在Measure方法之后且测量大小与之前不一样的时候被调用。

(7)onLayout()

该方法在当前View需要为其子View分配尺寸和位置时会被调用。

(8)onDraw(Canvas)

该方法用于View渲染内容的细节。

(9)onWindowFocusChanged()

该方法也可能在绘制过程中被调用,具体是在包含当前View的Window获得或失去焦点时被调用。此时可以设置代码中定义的View的一些LayoutParameter。

如果View进入了销毁阶段,肯定是会被调用的。

(10)onWindowVisibilityChanged()

该方法同上,具体是在包含当前View的Window可见性改变时被调用。

(11)onDetachedFromWindow()

当View离开附着的窗口时触发,比如在Activity调用onDestroy方法时View就会离开窗口。和一开始的AttachedToWindow相对,都只会被调用一次。

坐标系

在Android坐标系中,以屏幕左上角作为原点,这个原点向右是X轴的正轴,向下是Y轴正轴。

View坐标系看下图:
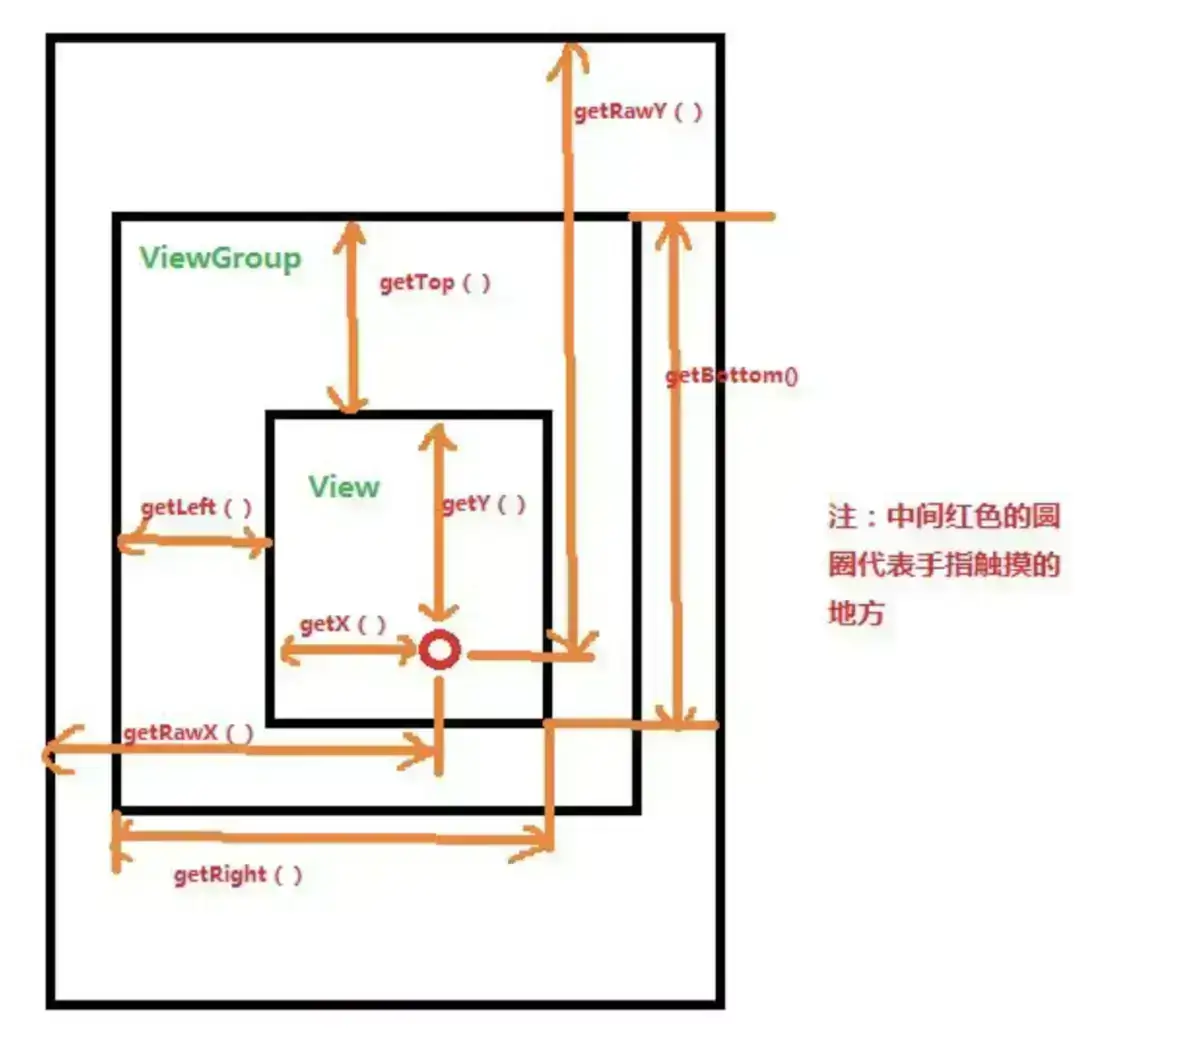
View 坐标系

  • getTop():获取View到其父布局顶边的距离
  • getLeft():获取View到其父布局左边的距离
  • getBottom():获取View到其父布局顶边的距离
  • getRight():获取View到其父布局左边的距离
  • getX():表示的是触摸的点距离自身左边界的距离
  • getY():表示的是触摸的点距离自身上边界的距离
  • getRawX():表示的是触摸点距离屏幕左边界的距离
  • getRawY():表示的是触摸点距离屏幕上边界的距离

自定义属性

在自定义View后编写values/attrs.xml,在其中编写styleable和item自定义属性标签元素
在布局文件中View使用自定义的属性(注意namespace),在View的构造方法中通过TypedArray获取

1
2
3
4
5
6
7
8
9
10
11
12
13
14
15
<?xml version="1.0" encoding="utf-8"?>
<resources>
<declare-styleable name="test">
<attr name="text" format="string" />
<attr name="testAttr" format="integer" />
<attr name = "background" format = "reference" />
<attr name="gravity">
<flag name="top" value="0x01" />
<flag name="bottom" value="0x02" />
<flag name="left" value="0x04" />
<flag name="right" value="0x08" />
<flag name="center_vertical" value="0x16" />
</attr>
</declare-styleable>
</resources>

获取方式:

1
2
3
4
5
6
7
8
9
10
11
12
 public class MyTextView extends View {

//在View的构造方法中通过TypedArray获取
public MyTextView(Context context, AttributeSet attrs) {
super(context, attrs);
TypedArray ta = context.obtainStyledAttributes(attrs, R.styleable.test);
String text = ta.getString(R.styleable.test_testAttr);
int textAttr = ta.getInteger(R.styleable.test_text, -1);
......
ta.recycle();
}
}

自定义view

  1. 重写构造方法
1
2
3
4
5
6
7
8
9
10
11
12
13
14
15
16
17
18
public MyTextView(Context context) {
this(context, null);
}

public MyTextView(Context context, @Nullable AttributeSet attrs) {
this(context, attrs, 0);
}

public MyTextView(Context context, @Nullable AttributeSet attrs, int defStyleAttr) {
super(context, attrs, defStyleAttr);
init();
}

@RequiresApi(api = Build.VERSION_CODES.LOLLIPOP)
public MyTextView(Context context, @Nullable AttributeSet attrs, int defStyleAttr, int defStyleRes) {
super(context, attrs, defStyleAttr, defStyleRes);
init();
}
  1. 重写onMeasure方法
    我们可以通过onMeasure()方法提供的参数widthMeasureSpec和heightMeasureSpec来分别获取控件宽度和高度的测量模式和测量值(测量 = 测量模式 + 测量值)。
    widthMeasureSpec和heightMeasureSpec虽然只是int类型的值,但它们是通过MeasureSpec类进行了编码处理的,其中封装了测量模式和测量值。
    因此我们可以分别通过MeasureSpec.getMode(xMeasureSpec)和MeasureSpec. getSize(xMeasureSpec)来获取到控件或其子View的测量模式和测量值。
1
2
3
4
5
6
7
8
9
10
1)  EXACTLY:当宽高值设置为具体值时使用,如100DIP、match_parent等,此时取出的size是精确的尺寸;
2) AT_MOST:当宽高值设置为wrap_content时使用,此时取出的size是控件最大可获得的空间;
3) UNSPECIFIED:当没有指定宽高值时使用(很少见)。
4) getChildCount():获取子View的数量;
5) getChildAt(i):获取第i个子控件;
6) subView.getLayoutParams().width/height:设置或获取子控件的宽或高;
7) measureChild(child, widthMeasureSpec, heightMeasureSpec):测量子View的宽高;
8) child.getMeasuredHeight/width():执行完measureChild()方法后就可以通过这种方式获取子View的宽高值;
9) getPaddingLeft/Right/Top/Bottom():获取控件的四周内边距;
10) setMeasuredDimension(width, height):重新设置控件的宽高。
  1. 重写onDraw方法
    根据业务需求在onDraw方法中绘制UI,注意:不要将耗时操作或者初始化放到这个方法里
    自定义ViewGroup时:
    1).首先,我们得知道各个子View的大小,只有先知道子View的大小,我们才知道ViewGroup该设置为多大去容纳它们。
    2).根据子View的大小,以及我们的ViewGroup要实现的功能,决定出ViewGroup的大小
    3).ViewGroup和子View的大小算出来了之后,接下来就是去摆放了吧,具体怎么摆放?得根据你定制的需求去摆放,比如,你想让子View按照垂直顺序一个挨着一个放,或者是按照先后顺序一个叠一个去放,这是你自己决定的。
    4).已经知道怎么摆放还不行啊,决定了怎么摆放就是相当于把已有的空间”分割”成大大小小的空间,每个空间对应一个子View,我们接下来就是把子View对号入座了,把它们放进它们该放的地方去。

  2. 重写OnLayout方法(摆放子View位置)
    例如:

1
2
3
4
5
6
7
8
9
10
11
12
13
14
15
@Override
protected void onLayout(boolean changed, int l, int t, int r, int b) {
int count = getChildCount();
//记录当前的高度位置
int curHeight = t;
//将子View逐个摆放
for (int i = 0; i < count; i++) {
View child = getChildAt(i);
int height = child.getMeasuredHeight();
int width = child.getMeasuredWidth();
//摆放子View,参数分别是子View矩形区域的左、上、右、下边
child.layout(l, curHeight, l + width, curHeight + height);
curHeight += height;
}
}

效果图源码

1
2
3
4
5
6
7
8
9
10
11
12
13
14
15
16
17
18
19
20
21
22
23
24
25
26
27
28
29
30
31
32
33
34
35
36
37
38
39
40
41
42
43
44
45
46
47
48
49
50
51
52
53
54
55
56
57
58
59
60
61
62
63
64
65
66
67
68
69
70
71
72
73
74
75
76
77
78
79
80
81
82
public class TestView extends View {
private Paint paint;
private Path path;
private Bitmap bitmap;
private PathMeasure mPathMeasure;
private float mLength;
private float mAnimatorValue;
private float[] pos;
private float[] tan;

public TestView(Context context) {
this(context, null);
}

public TestView(Context context, @Nullable AttributeSet attrs) {
this(context, attrs, 0);
}

public TestView(Context context, @Nullable AttributeSet attrs, int defStyleAttr) {
super(context, attrs, defStyleAttr);
init();
}

@RequiresApi(api = Build.VERSION_CODES.LOLLIPOP)
public TestView(Context context, @Nullable AttributeSet attrs, int defStyleAttr, int defStyleRes) {
super(context, attrs, defStyleAttr, defStyleRes);
init();
}


private void init() {
paint = new Paint();
paint.setAntiAlias(true); //防锯齿
paint.setDither(true); //防抖动
paint.setStyle(Paint.Style.FILL); //画笔类型 STROKE空心 FILL 实心 FILL_AND_STROKE 用契形填充
paint.setColor(Color.BLUE);

path = new Path();
path.moveTo(390, 100);
path.lineTo(110, 100);
path.quadTo(100, 100, 100, 110);
path.lineTo(100, 190);
path.quadTo(100, 200, 110, 200);
path.lineTo(390, 200);
path.quadTo(400, 200, 400, 190);
path.lineTo(400, 110);
path.quadTo(400, 100, 390, 100);
bitmap = BitmapFactory.decodeResource(getResources(), R.drawable.icon_camera_take);
bitmap = Bitmap.createScaledBitmap(bitmap, 16, 16, false);
mPathMeasure = new PathMeasure(path, false);
mLength = mPathMeasure.getLength();
pos = new float[2];
tan = new float[2];
ValueAnimator valueAnimator = ValueAnimator.ofFloat(0, 1);
valueAnimator.setDuration(5000);
valueAnimator.addUpdateListener(new ValueAnimator.AnimatorUpdateListener() {
@Override
public void onAnimationUpdate(ValueAnimator animation) {
mAnimatorValue = (float) animation.getAnimatedValue();
postInvalidate();

}
});
valueAnimator.setInterpolator(new LinearInterpolator());
valueAnimator.setRepeatCount(ValueAnimator.INFINITE);
valueAnimator.start();
}

@Override
protected void onDraw(Canvas canvas) {
super.onDraw(canvas);
canvas.drawPath(path, paint);
mPathMeasure.getPosTan(mLength * mAnimatorValue, pos, tan);
/* float degrees = (float) (Math.atan2(tan[1], tan[0]) * 180.0 / Math.PI);
canvas.rotate(degrees, pos[0], pos[1]);*/
if (mAnimatorValue >= 0.8 || mAnimatorValue <= 0.05) {

} else {
canvas.drawBitmap(bitmap, pos[0] - bitmap.getWidth() / 2, pos[1] - bitmap.getHeight() / 2, null);
}
}
}